

The iPhone cemented its place as a top contender for the best cameras on smartphones. Its remarkable camera technology and intuitive interface placed the power to capture breathtaking moments literally at our fingertips. This guide offers essential iPhone photography tips to level up your photos.
Over the past two years, I’ve immersed myself in the world of iPhone photography, experimenting with different techniques and settings. I’ve learned that while the iPhone is incredibly versatile, there are specific approaches that can significantly elevate your images. From mastering composition to harnessing natural light, I’ll share practical tips that have transformed my own photography journey.
Table of Contents
Getting Started with iPhone Photography
First things first, get to know your iPhone camera. Understanding its capabilities and features will help you leverage its full potential. Start by exploring the camera app and its various modes. Familiarize yourself with options like Portrait mode, Night mode, and Live Photos. Each of these modes is designed to enhance different types of photography, making your photos look more professional with minimal effort.
Moreover, take advantage of the camera settings. Experiment with focus, exposure, and white balance to fine-tune your images. While the iPhone does an excellent job with automatic settings, taking manual control can give you more creative freedom. Additionally, consider using the gridlines to assist with composition and ensure your subjects are properly aligned.
Furthermore, don’t be afraid to explore different perspectives. Get low to the ground, shoot from high angles, or try unique viewpoints to add interest to your photos. Experimentation is key to developing your own photographic style.
iPhone Photography Tips #1: Basic Settings and Adjustments
One of the most important aspects of photography is controlling exposure and focus. On your iPhone, you can tap on the screen to set the focus point, and a sun icon will appear, allowing you to adjust the exposure by sliding up or down. Additionally, turning on the grid feature in the camera settings can help you compose your shots using the rule of thirds, a fundamental composition technique.
Furthermore, understanding white balance is crucial for accurate color representation. The iPhone automatically adjusts white balance, but you can manually fine-tune it for specific lighting conditions. Experiment with the different white balance presets to see how they affect your images.
In addition, explore the HDR (High Dynamic Range) mode. This feature helps capture details in both the highlights and shadows of a scene, resulting in a more dynamic image. However, be mindful that HDR can sometimes create an unnatural look, so use it judiciously.
Moreover, take advantage of the exposure lock feature. Once you’ve achieved the desired exposure, lock it by tapping and holding the screen until the AE/AF Lock icon appears. This prevents the camera from automatically adjusting exposure as you recompose your shot.
iPhone Photography Tips #2: Mastering the Camera Modes
Understanding and effectively utilizing your iPhone’s camera modes is essential for capturing diverse and captivating images.
Portrait Mode
Firstly, let’s explore Portrait mode. This mode excels at creating stunning portraits with a beautiful depth-of-field effect, where the subject is sharply focused while the background gracefully blurs. To achieve the best results, ensure you have sufficient lighting and maintain a suitable distance between your subject and the camera.
Night Mode
Secondly, Night mode is a powerful tool for capturing clear and vibrant images in low-light environments. The iPhone intelligently adjusts exposure time to gather more light, resulting in significantly improved image quality. For optimal results, try using a tripod or stabilizing your phone to minimize camera shake.
Live Photos
Lastly, Live Photos add a dynamic element to your photography. By capturing a few seconds of motion and sound before and after the main shot, Live Photos bring your images to life. This mode is ideal for capturing spontaneous moments and creating engaging visual stories.
In addition to these core modes, experiment with other options like Time-lapse and Slo-mo to add creative flair to your photography. By mastering these camera modes, you’ll unlock a world of possibilities and elevate your iPhone photography to new heights.
iPhone Photography Tips #3: Composition Techniques
Composition is the art of arranging elements within a frame to create a visually appealing and impactful image. Let’s explore some fundamental composition techniques to elevate your iPhone photography.
Rule of Thirds
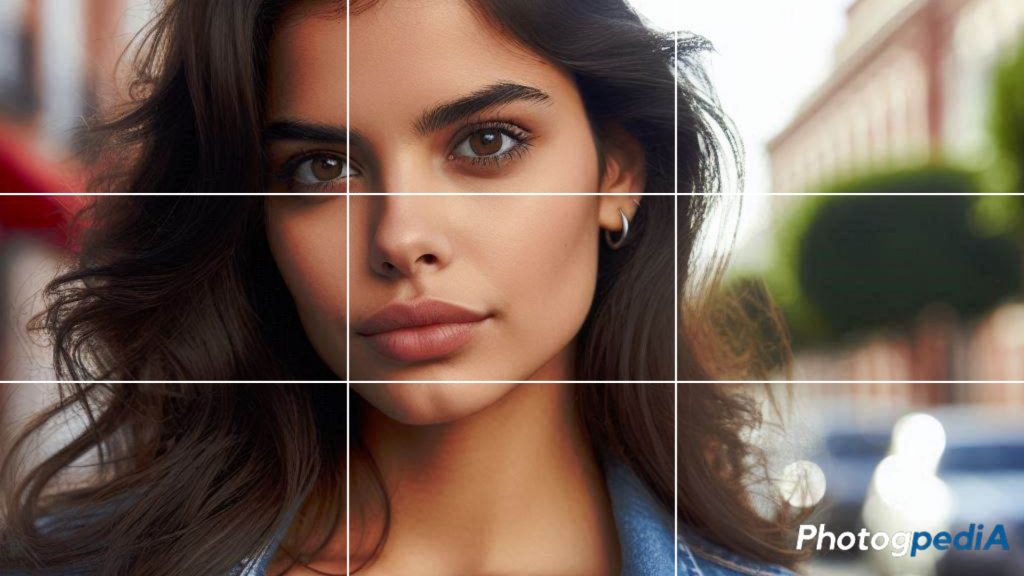
The rule of thirds is a fundamental composition technique that can significantly enhance your iPhone photography. Imagine dividing your frame into nine equal parts using two horizontal and two vertical lines. The intersections of these lines are considered powerful focal points. By strategically placing your subject along these lines or at their intersections, you can create a more visually appealing and balanced image.
For instance, when photographing a landscape, position the horizon along one of the horizontal lines to give the photo more weight either in the sky or the foreground. Similarly, when capturing a portrait, place the subject’s eyes along one of the upper horizontal lines to draw the viewer’s attention.
However, it’s important to remember that the rule of thirds is a guideline, not a rigid rule. Sometimes breaking the rules can lead to creative and impactful images. Experiment with different compositions to find what works best for your vision.
Leading Lines

Leading lines are a powerful compositional tool that can dramatically enhance your iPhone photography. Look for natural lines in your environment, such as roads, rivers, fences, or even rows of trees, to serve as leading lines. These lines can be straight, curved, or converging, each offering unique opportunities for creative expression. For example, a winding road can lead the viewer’s eye towards a distant horizon, while a series of railway tracks can create a strong sense of perspective.
Additionally, architectural elements like bridges, buildings, and staircases often provide excellent opportunities for utilizing leading lines. Consider how these lines can frame your subject or create a sense of movement within the image.
Moreover, don’t overlook the potential of diagonal lines to add energy and dynamism to your photos. Diagonal lines can create a feeling of action and tension, drawing the viewer’s eye through the frame in a more dynamic way.
Symmetry and Patterns
Firstly, symmetry, the balance of elements around a central axis, can create a sense of order and tranquility in your photos. Look for symmetrical compositions in architecture, like buildings with identical facades or reflective surfaces. Nature also offers abundant opportunities for symmetrical photography, such as symmetrical flower arrangements or the perfect reflection of a tree in a still pond.
Secondly, patterns, the repetition of elements or forms, can add visual interest and rhythm to your images. Explore the world around you to find patterns in architecture, nature, and everyday objects. For example, the repetition of windows in a building, the arrangement of leaves on a tree, or the waves on a beach can create captivating patterns.
Additionally, combining symmetry and patterns can create even more visually compelling compositions. For instance, a symmetrical arrangement of patterned elements can create a sense of both order and complexity.
iPhone Photography Tips #4: Lighting
Lighting makes or breaks your photos. It’s essential in capturing clear and detailed images. Here are different ways you can utilize light to your advantage:
Natural Light
Natural light is often hailed as the most flattering and versatile light source for photography. It offers a soft, diffused quality that can enhance colors, textures, and overall image aesthetics. The golden hour, the period shortly after sunrise or before sunset, is particularly prized for its warm, golden glow.
However, even on overcast days, natural light can create a beautiful, ethereal atmosphere in your photographs. By understanding how to utilize natural light, you can capture stunning images that evoke emotion and capture the essence of a scene.
Additionally, experimenting with different angles and positions in relation to the natural light source can dramatically impact the mood and atmosphere of your photos. Consider using side lighting to create dramatic shadows, or backlighting to create a halo effect around your subject.
Using Artificial Light
While natural light is often preferred, there are countless situations where artificial light is necessary or desirable. Whether you’re shooting indoors, at night, or in challenging lighting conditions, understanding how to use artificial light effectively is essential.
For instance, indoor photography often relies on artificial light sources, such as lamps, overhead lights, or even candles. Experiment with different lighting setups to create various effects, from soft and diffused to dramatic and high-contrast.
Moreover, when shooting portraits, consider using a ring light or softbox to create flattering and even illumination. These light modifiers can help to reduce harsh shadows and create a more polished look.
Furthermore, don’t be afraid to experiment with multiple light sources to create complex and dynamic lighting setups. By understanding the interplay of light and shadow, you can add depth and dimension to your images.
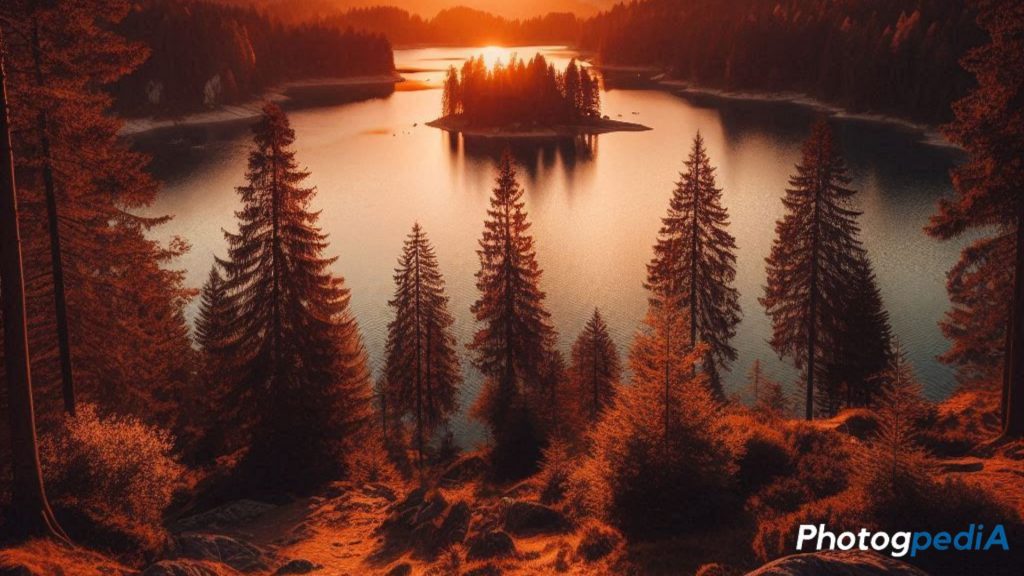
Golden Hour Photography
The golden hour, that enchanting period shortly after sunrise or before sunset, offers photographers a unique opportunity to capture breathtaking images. During this time, the sun is low on the horizon, casting a warm, golden glow that transforms ordinary scenes into extraordinary ones.
Consequently, the colors in your photos will appear richer, more saturated, and imbued with a magical quality. The long shadows created by the low sun can also add depth and drama to your images.
Furthermore, the golden hour is ideal for portrait photography, as the soft, flattering light can enhance skin tones and create a dreamy, romantic atmosphere.
Additionally, landscapes and cityscapes can benefit greatly from the golden hour’s magical light. The warm hues can create a sense of nostalgia and evoke a feeling of peace and tranquility.
Enhancing Photos with Apps
There are numerous editing apps available for the iPhone that can take your photos to the next level. Some of the best include Adobe Lightroom, Snapseed, and VSCO. These apps offer a range of editing tools, from basic adjustments like brightness and contrast to advanced features like selective editing and filters.
Basic Editing Techniques
Start with basic edits to improve your photos. Adjust the exposure, contrast, and saturation to enhance the overall look. Use cropping to remove any unwanted elements and straighten the horizon for a professional feel.
Tips for Specific Scenarios
Landscape Photography
For stunning landscape photos, use a wide-angle lens to capture more of the scene. Incorporate leading lines and foreground elements to add depth and interest. Shoot during the golden hour for the best lighting and colors.
Portrait Photography
When taking portraits, focus on the eyes and use Portrait mode to blur the background. Pay attention to the lighting—natural light from a window can create beautiful, soft portraits. Experiment with different angles and expressions to capture the personality of your subject.
Street Photography
Street photography is all about capturing candid moments in public spaces. Keep your camera ready and use burst mode to capture spontaneous interactions. Be respectful of people’s privacy and aware of your surroundings.
Conclusion
Mastering iPhone photography is all about practice and experimentation. With the tips and techniques outlined in this article, you’re well on your way to capturing stunning images that showcase your creativity. Remember, the best camera is the one you have with you, and with an iPhone in your pocket, you’re always ready to capture life’s moments.
FAQs
What is the best iPhone for photography?
The latest models, like the iPhone 13 Pro and iPhone 13 Pro Max, offer advanced camera systems with multiple lenses and features like Night mode and ProRAW. However, even older models like the iPhone XR and iPhone 11 have excellent cameras that can produce stunning photos.
How can I take better photos in low light?
Use Night mode on your iPhone to capture more detail in low-light conditions. Keep your phone steady, or use a tripod to avoid camera shake. Experiment with different light sources, like streetlights or candles, to add interesting effects to your photos.
What are some common mistakes to avoid?
Avoid zooming in digitally, as it can reduce the quality of your photos. Instead, move closer to your subject. Be mindful of cluttered backgrounds and distractions that can take focus away from your main subject. Also, avoid over-editing your photos, which can make them look unnatural.
How do I keep my photos organized?
Regularly review and delete unwanted photos to keep your library manageable. Use albums and tags to categorize your images, and back up your photos to iCloud or an external storage device to prevent loss.
Can I use my iPhone for professional photography?
Absolutely! Many professional photographers use iPhones for their work, especially for social media and on-the-go shots. With the right techniques and accessories, your iPhone can produce high-quality, professional-grade photos.
Keep Exploring the World of iPhone Photography Tips
We’ve covered a lot of ground in this guide, from the basics of iPhone photography to advanced composition techniques and lighting considerations. But the journey to becoming a skilled iPhone photographer is far from over. There’s always more to learn and discover.
To continue your photography adventure, check out these other informative articles on our blog:
- Megapixels in Phone Photography: Understanding the role of megapixels in image quality.
- Low Light Phone Photography: Tips and tricks for capturing stunning photos in low-light conditions.
- Phone Photography Easy Tips & Tricks: Quick and simple ways to improve your iPhone photography.
Remember, practice is key to mastering iPhone photography. Keep experimenting, exploring different styles, and most importantly, have fun!
About the Author
Hi, I’m Mark – an amateur photographer that first started in 2020. I particularly capture action figures in miniature settings and dioramas. You can follow more of my work at the following social media channels:
- Instagram – iselandmarkventures
- Facebook – iselandmarkventures
- YouTube – The Iselandmarkventures