

Snapseed provides an easy and on the go photo editing and post-processing experience!
Editing and post-processing your photos is a fantastic tool to take your photos to a whole new level. There are multiple variables needed to be considered before starting. With the numerous software and applications available, which one should you use?
In this blog post, an overview and in-depth guide for Snapseed is available for you to digest. If a total rundown for every feature and how to use them is what you’re looking for then you’ve come to the right place!
Table of Contents
What is Snapseed?
Snapseed is a free-to-use photo editing application for mobile devices. This application is available for both the Android and iOS systems. It’s a powerful tool capable of transforming your photos. It provides a wide range of essential photo adjustment tools. Snapseed has been created by Nik Software and currently is owned by Google.
It has a simple and user-friendly interface that both beginners and professionals enjoy. Easily access these tools with just a few taps.
It also provides filters just like Instagram. Effortlessly apply multiple adjustments to photos with a single tap. Categories for these filters are film, black and white, and preset looks.
Snapseed System Requirements
Before diving into the tools and features of Snapseed, here are the minimum system requirements. Most phones being released are surely capable of running Snapseed smoothly. Nevertheless, it is great to know and keep in mind these options for compatibility.
Android
- OS 4.1 or later*
- RAW editing is available for DNG RAW file types only on any device that can capture DNG, and on most other recent devices
*Due to hardware limitations, the Motorola Xoom MZ604 is no longer compatible
iOS
- iOS 9.0 or later
- RAW editing is available for all RAW file types on all current device models**
**iPad 2, iPad 3, iPad 4 and iPad mini are known to produce artifacts with some photos from some cameras
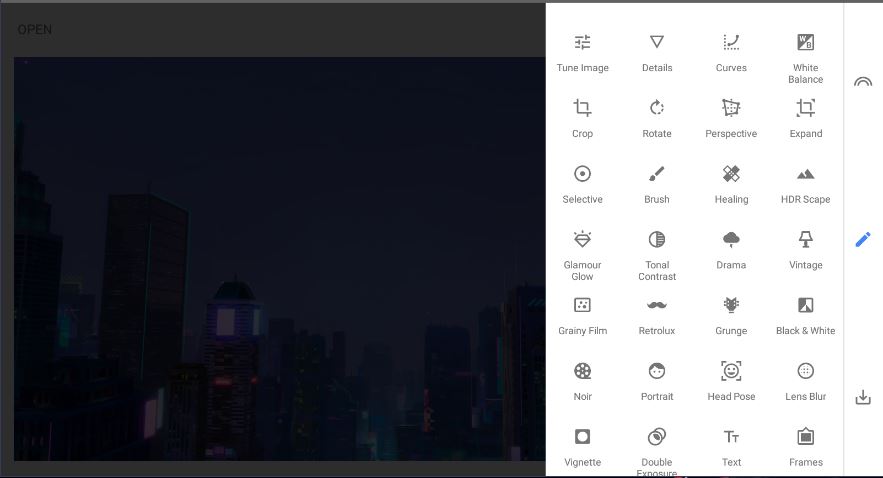
How To Use Snapseed : Tools And Features
In this section, we discuss all of the useful tools and features of Snapseed. Have your Snapseed open and explore all of these as we go along!
Looks
In this feature, a selection of filters are available. With just a single tap on one of these, a preview of how they look will show. These options are divided into two. Portrait, Smooth, Pop, Accentuate, Faded Glow, Morning, and Bright apply colored adjustments to your photos. On the other hand; Fine Art, Push, Structure, and Silhouette employ a black and white alteration to the photos.
Tune Image
In this tool, the base properties of a photo is the target for adjustments. Change the Brightness, Contrast, Saturation, Ambiance, Highlights, Shadows, and Warmth of your photo. Learn more about these properties in our article about Lighting.
An Auto Adjust option is also available for this tool. It analyzes the photo and applies instant adjustments to all of these properties. Have a go at it and see if you agree with the AI’s auto adjustment!
Details
With the Details tool, the options for Structure and Sharpening are available. These two options are able to increase the small and minute details of the photo. It makes the subject focus clearer and sharper.
Curves
In the curves tool, the specific tones, colors, and contrasts of the photo offers options for alteration. You can select the Red, Green, Blue, and Luminance curves separately.
There are also multiple presets to choose from that apply an instant look to the photo. Some notable presets from these are Soft Contrast, Hard Contrast, Brighten, and Darken.
White Balance
The White Balance tool expands the adjustments for warmth. It showcases an Auto Adjustment option that automatically modifies the photo. It also has a manual option so that you can adjust the Temperature and Tint sliders to your liking. This tool also offers a selection tool. Use this to select an area on your photo to serve as a reference for white balance adjustments. The app will automatically adjust the settings based on the area you selected.
Crop
The Crop tool provides a set of ratios ranging from 1×1 to 16×9 to crop your photo. It also has a Free option so that you can crop the photo in any dimension you want.
Rotate
The Rotate tool, once chosen, can auto rotate your photo to what the AI sees as horizontally or vertically straight. Manual adjustments of orientation angle can also be done here. Flipping the photo is also available in this tool. A single tap on the rotate button also changes the photo’s orientation from landscape to portrait or vice-versa.
Perspective
The Perspective tool lets the user warp its photo to alter the perspective of the shot. Primary options for these are Tilt, Rotate, Scale, and Free. The secondary option chooses the background of the photo as you alter the perspective. Smart, White, and Black are the available options.
Expand
Next is the expand tool. This helps resize your base photo by smartly adjusting what elements to add in its expansion. For example, a photo of a scenery when expanded will have noticeable added elements such as trees or mountains.
Selective
The Selective tool, from the word itself, lets the user select a particular detail and area in the photo to be altered. This lets the user adjust the Brightness, Contrast, Saturation, and Structure of the selected portion.
Brush
The Selective tool, from the word itself, lets the user select a particular detail and area in the photo to be altered. This lets the user adjust the Brightness, Contrast, Saturation, and Structure of the selected portion.
Healing
The healing tool uses the AI to manually correct certain areas with faults. If unwanted details are in the photo, a tap or stroke on it would copy elements nearby and overlay it on top. This is helpful in scenarios such as wires or branches covering the sky etc.
HDR Scape
The HDR Scape tool in Snapseed contains 4 preset HDR modifying filters. These are Nature, People, Fine, and Strong. The user can also adjust the HDR Values of a photo manually upon selection of a filter. The Filter Strength, Saturation, and Brightness are the adjustable values.
Glamour Glow
The Glamour Glow Snapseed tool adjusts the glow – Brightness and Highlights, Saturation, and Warmth. There are 5 presets available and the values of the previous properties could be manually adjusted.
Tonal Contrast
Aside from the normal contrast adjustments through the Curves and Tune Image tools, the tonal contrast could also be adjusted. High Tones, Mid Tones, Low Tones, Protect Shadows, Protect Highlights are the properties available for alteration.
Drama
Another addition to the choice of filters is the Drama tool. This provides a cinematic and grainy effect to the photo with a variety of 6 options. These are Drama 1, Drama 2, Bright 1, Bright 2, Dark 1, and lastly Dark 2.
Vintage
The Vintage Snapseed tool applies a vintage camera filter to your photo. It has 12 presets to choose from also with the ability to adjust the Brightness, Saturation, Style Strength, and Vignette Strength. A blur could also be applied to the photo with a single tap on the Blur option.
Grainy Film
The Grainy Film Tool allows the user to pick from numerous filters to apply a film camera filter. The amount of Grain and Style Strength could be adjusted manually. (This is my personal favorite tool!)
Retrolux and Grunge
The Retrolux tool in Snapseed also offers multiple filters to apply a super retro look to your photos. Feeling lucky? The Shuffle option in this tool lets the app employ random filters to the photo. Also, tapping a filter multiple times shows another variation for it. For manual adjustments, the options available are: Brightness, Contrast, Saturation, Style Strength, Scratches, and Light Leaks.
Similarly, the Grunge tool also provides filters to achieve retro looks but by application of textures. Try out the multiple styles to choose from and the manual settings for adjustments! The shuffle tool is also available to apply random presets.
Black & White and Noir
These tools provide filters to turn your colored photos black and white. There are small differences between the two with regards to the available options to manually adjust as well as the wash of how soft or hard it applies to the photo.
Portrait
The Portrait photo analyzes the photo to find a face and adjust multiple variables. Firstly, the Skin Tone can be adjusted to Pale, Fair, Medium, and Dark. Next, manual adjustments could be done on Face Spotlight, Skin Smoothing, and Eye Clarity. Lastly if all these are daunting, there are available filters or presets to choose from that have automatic settings to apply to your photos.
Head Pose
The Snapseed Head Pose tool uses the AI to detect a face in the photo. Once found, the pupil size, smile and focal length are made available to alter. The orientation of the face could also be changed by sliding any direction in the photo under the Head Pose option.
Lens Blur
The Lens Blur tool selects a certain part of the photo to be the focus. It could be a circular blur or linear blur. The other parts of the photo become blurred when using this tool. The radius of the blur can be adjusted by using two fingers to make a “zoom” motion in the photo. Blur Strength, Transition, and Vignette could be manually adjusted.
Vignette
The Vignette tool adds a shadow on the corners of the photo. The Outer Brightness and Inner Brightness could be adjusted to provide either a black or white vignette to the photo.
Double Exposure
The Double Exposure feature in Snapseed allows you to add another photo on top of your base photo. After selecting the Add Image option and choosing which photo to add, the opacity of the added photo can be adjusted. The type of blending of the added photo can also be altered to Lighten, Darken, Add, Subtract, and Overlay.
Text
The Text tool allows the user to add text to the photos. Snapseed offers a variety of text fonts and layouts. Upon choosing a desired Style and typing in the text you want to display, a variety of options could be manually changed as well. Color changes the text color. Lastly, Opacity changes the transparency of the text as well as inverting the areas where the text is displayed.
Frames
The Last feature that Snapseed offers are Frames. This tool offers numerous Frame designs for the user. Upon choosing a desired option, adjust the Frame Width from thick to thin.
Snapseed Mastery
Snapseed is an extremely useful and portable tool for editing. It being available for use on the go because of its mobile phone exclusivity, makes it a must have for photographers. Both beginner and professional photographers benefit from Snapseed’s easy-to-use interface. The wide variety of options it provides make it an excellent free-to-use app for everyone.
Continuous use of Snapseed provides great familiarity with its functions. One can utilize its full potential with practice and diligence. Go out, take photos, and edit them using Snapseed!